How to customize your checkout

This guide will help you customize your checkout by creating a fully custom CartItem component. We’ll be creating a component from scratch that allows customers to view items in their cart, retrieve the currency and language from the session  using the useCheckoutSession hook to properly format the currency, update quantities, and remove items using the useCheckoutAction hook and show alerts using the useMessages hook.
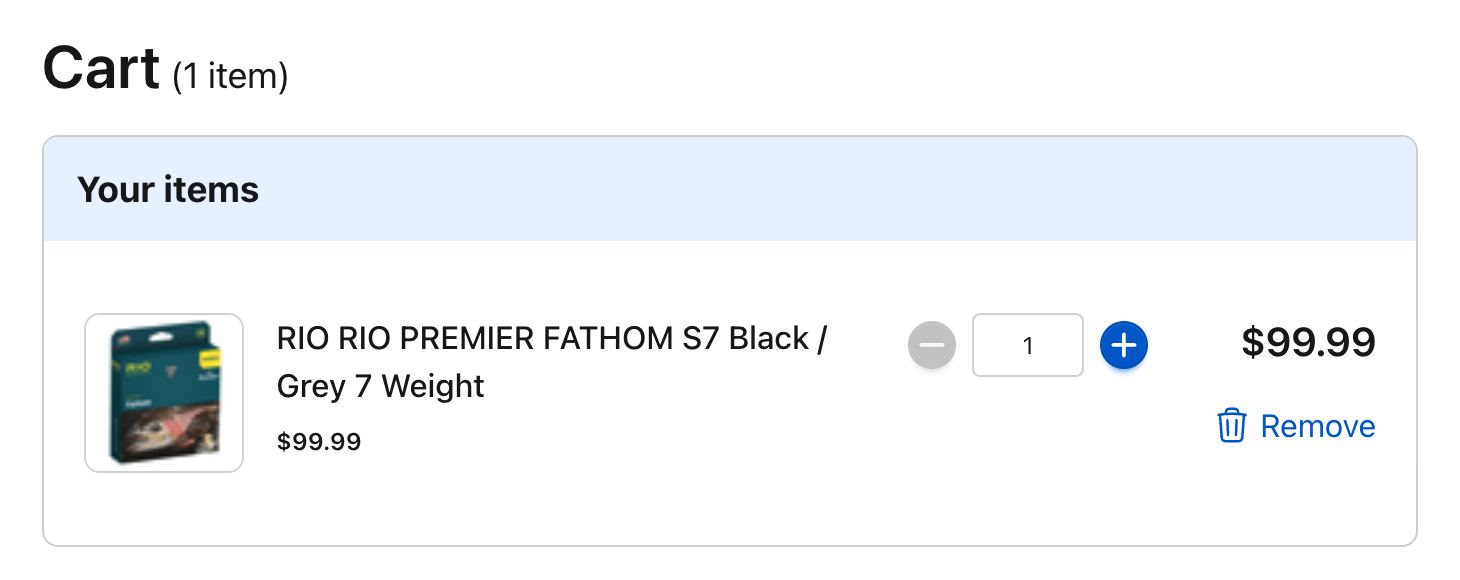
Cart Item Pn

Prerequisites

This tutorial will use the hooks available via the SDK. To learn more about them you can review the Hooks documentation. We recommended going through the quickstarter guide first.

Custom “Cart Item” Component

Folder Structure

First, We will create a new folder for our project, called 'CartItem'. Inside this folder, let’s add the basic UI structure for our CartItem component.Create a new file called 'index.tsx' and add the following code:
index.tsx
import React from "react";
import styles from "./styles.module.css";

// Define a simple CartItem type
type CartItemType = {
  id: string;
  name: string;
  quantity: number;
  price: number;
  originalPrice?: number;
  available: boolean;
  index: number;
  image?: string;
  url: string;
};

export default function CartItem({
  item = {
    id: "1",
    name: "Product Name",
    quantity: 1,
    price: 10000,
    originalPrice: 12000,
    available: true,
    index: 0,
    image: "https://example.com/image.jpg",
    url: "/product-name/p",
  },
} : {
  item: CartItemType;
}) {
  const hasDiscount = item.originalPrice && item.price !== item.originalPrice;
  
  return (
    <div className={styles.cartItem}>
      {/* Product Image */}
      <div className={styles.imageContainer}>
        {item.image ? (
          <img src={item.image} alt={item.name} className={styles.itemImage} />
        ) : (
          <div className={styles.placeholderImage} />
        )}
      </div>
      
      {/* Product Details */}
      <div className={styles.itemDetails}>
        <h3 className={styles.itemName}>{item.name}</h3>

        {/* Price Display with Discount Logic */}
        {hasDiscount ? (
          <div className={styles.priceContainer}>
            <p className={styles.originalPrice}>
              {item.originalPrice}
            </p>
            <p className={styles.itemPrice}>{item.price}</p>
          </div>
        ) : (
          <p className={styles.itemPrice}>{item.price}</p>
        )}
      </div>
      
      {/* Quantity Controls - Will add functionality later */}
      <div className={styles.itemActions}>
        <div className={styles.quantityControl}>
          <button
            type="button"
            className={styles.quantityButton}
            disabled={item.quantity <= 1}
            aria-label="Decrease quantity"
          >
            -
          </button>
          <span className={styles.quantity}>{item.quantity}</span>
          <button
            className={styles.quantityButton}
            type="button"
            aria-label="Increase quantity"
          >
            +
          </button>
        </div>

        {/* Remove Button - Will add functionality later */}
        <button
          className={styles.removeButton}
          type="button"
          aria-label="Remove item"
        >
          <span>Remove</span>
        </button>
      </div>
      
      {/* Total Price */}
      <b className={styles.itemTotal}>
        {item.price * item.quantity}
      </b>
    </div>
  );
}

Add styling

Create a CSS module file named styles.module.css with the following styles:
styles.module.css
.cartItem {
  display: grid;
  grid-template-columns: 100px 1fr auto auto;
  align-items: center;
  gap: 16px;
  padding: 16px;
  border-bottom: 1px solid #e0e0e0;
}

.imageContainer {
  width: 80px;
  height: 80px;
}

.itemImage {
  width: 100%;
  height: 100%;
  object-fit: cover;
  border-radius: 4px;
}

.placeholderImage {
  width: 100%;
  height: 100%;
  background-color: #f0f0f0;
  border-radius: 4px;
}

.itemDetails {
  display: flex;
  flex-direction: column;
  gap: 4px;
}

.itemName {
  margin: 0;
  font-size: 16px;
  font-weight: 500;
}

.priceContainer {
  display: flex;
  align-items: center;
  gap: 8px;
}

.originalPrice {
  text-decoration: line-through;
  color: #888;
  margin: 0;
}

.itemPrice {
  margin: 0;
  font-weight: 500;
}

.itemActions {
  display: flex;
  flex-direction: column;
  gap: 8px;
  align-items: center;
}

.quantityControl {
  display: flex;
  align-items: center;
  border: 1px solid #e0e0e0;
  border-radius: 4px;
}

.quantityButton {
  border: none;
  background-color: transparent;
  padding: 4px 8px;
  cursor: pointer;
  font-size: 16px;
}

.quantityButton:disabled {
  opacity: 0.5;
  cursor: not-allowed;
}

.quantity {
  padding: 0 8px;
  min-width: 24px;
  text-align: center;
}

.removeButton {
  background-color: transparent;
  border: none;
  color: #ff4d4f;
  cursor: pointer;
  padding: 4px;
  font-size: 14px;
}

.itemTotal {
  font-weight: 700;
}

Add Session

The first two steps were very simple. It’s a simple react component, which you could have easily created yourself with any AI Coding Agent.The fun starts now. With the component in place we need to get this component to interact with your ecommerce provider.We’ve built an SDK with some React Hooks to make this super easy.Let’s enhance our CartItem component to use the useCheckoutSession hook to access session data. This will allow us to use the session’s currency and language settings.
Take a look at our SDK docs for a refresher on the concepts
1

Import the useCheckoutSession hook from the Ollie SDK

Update the 'index.tsx' file to import the useCheckoutSession hook from the SDK
index.tsx
import { useCheckoutSession, type CheckoutSession } from "@ollie-shop/sdk";
2

Delete the original CartItemType

Now we can delete the original CartItemType because the SDK already exports a type
index.tsx
// Delete this snippet from the original code
type CartItemType = {
  id: string;
  name: string;
  quantity: number;
  price: number;
  originalPrice?: number;
  available: boolean;
  index: number;
  image?: string;
  url: string;
};
3

Update the CartItem to be of type CheckoutSession

In the CartItem component we’ll declare the item to be of type CheckoutSession
index.tsx
export default function CartItem({
  item = {
    id: "1",
    name: "Product Name",
    quantity: 1,
    price: 10000,
    originalPrice: 12000,
    available: true,
    index: 0,
    image: "https://example.com/image.jpg",
    url: "/product-name/p",
  },
} : {
  item: CheckoutSession['cartItems'][number];
}) {
  const { session } = useCheckoutSession();
  const { currency, language } = session.locale;
4

Format Price

To make our component prettier let’s include a function that formats the price according to the currency which is imported from the CheckoutSession
index.tsx
  // Format price utility function
  const formatPrice = (price: number) => {
    return new Intl.NumberFormat(language, {
      style: "currency",
      currency: currency,
    }).format(price / 100);
  };

...
5

Update the HTML Component to use the formatPrice function

index.tsx
...
//update the HTML to use formatPrice

return (
    <div className={styles.cartItem}>
      {/* Product Image */}
      <div className={styles.imageContainer}>
        {item.image ? (
          <img src={item.image} alt={item.name} className={styles.itemImage} />
        ) : (
          <div className={styles.placeholderImage} />
        )}
      </div>
      
      {/* Product Details */}
      <div className={styles.itemDetails}>
        <h3 className={styles.itemName}>{item.name}</h3>

        {/* Price Display with Discount Logic */}
        {hasDiscount ? (
          <div className={styles.priceContainer}>
            <p className={styles.originalPrice}>
              {formatPrice(item.originalPrice)}
            </p>
            <p className={styles.itemPrice}>{formatPrice(item.price)}</p>
          </div>
        ) : (
          <p className={styles.itemPrice}>{formatPrice(item.price)}</p>
        )}
      </div>
      
      {/* Quantity Controls - Will add functionality later */}
      <div className={styles.itemActions}>
        <div className={styles.quantityControl}>
          <button
            type="button"
            className={styles.quantityButton}
            disabled={item.quantity <= 1}
            aria-label="Decrease quantity"
          >
            -
          </button>
          <span className={styles.quantity}>{item.quantity}</span>
          <button
            className={styles.quantityButton}
            type="button"
            aria-label="Increase quantity"
          >
            +
          </button>
        </div>

        {/* Remove Button - Will add functionality later */}
        <button
          className={styles.removeButton}
          type="button"
          aria-label="Remove item"
        >
          <span>Remove</span>
        </button>
      </div>
      
      {/* Total Price */}
      <b className={styles.itemTotal}>
        {formatPrice(item.price * item.quantity)}
      </b>
    </div>
  );
}

Add Update / Remove Actions to the Component

Now let’s add functionality to update quantities and remove items. These actions already exist in the Ollie SDK
1

Import the useCheckoutAction hook from the Ollie SDK

In the index.tsx file, update the import to include theuseCheckoutAction
index.tsx
import {
  useCheckoutAction, // Add this import
  useCheckoutSession,
  type CheckoutSession
} from "@ollie-shop/sdk";
2

Include Actions

Add the action hooks for removing items and updating quantities:
index.tsx
// Add actions for removing items
const { execute: executeActionRemoveItems } =
  useCheckoutAction("REMOVE_ITEMS");

// Add actions for updating item quantity
const { execute: executeActionUpdateItemsQuantity } = useCheckoutAction(
  "UPDATE_ITEMS_QUANTITY"
);
3

Create functions that manipulate the item

Create handler functions for quantity changes and item removal:
index.tsx
// Handler for quantity changes
const handleQuantityChange = async (index: number, newQuantity: number) => {
  if (newQuantity <= 0) return;
  executeActionUpdateItemsQuantity([
    { index, quantity: newQuantity },
  ]);
};

// Handler for removing an item
const handleRemoveItem = async (index: number) => {
  executeActionRemoveItems([index]);
};
4

Update the buttons in your react component

Update the button components to use these handlers:
index.tsx
{/* Quantity Controls - Now with functionality */}
<div className={styles.quantityControl}>
  <button
    type="button"
    className={styles.quantityButton}
    onClick={() => handleQuantityChange(item.index, item.quantity - 1)}
    disabled={item.quantity <= 1}
    aria-label="Decrease quantity"
  >
    -
  </button>
  <span className={styles.quantity}>{item.quantity}</span>
  <button
    className={styles.quantityButton}
    type="button"
    onClick={() => handleQuantityChange(item.index, item.quantity + 1)}
    aria-label="Increase quantity"
  >
    +
  </button>
</div>

{/* Remove Button - Now with functionality */}
<button
  className={styles.removeButton}
  type="button"
  onClick={() => handleRemoveItem(item.index)}
  aria-label="Remove item"
>
  <span>Remove</span>
</button>

Add the alerts (messages)

Let’s add feedback messages to inform users when actions succeed or fail. Here are the specific changes needed:
1

Import the useMessages hook from the Ollie SDK

First, update the imports to include useMessages:
index.tsx
import {
  useMessages, // Add this import
  useCheckoutAction,
  useCheckoutSession,
  type CheckoutSession
} from "@ollie-shop/sdk";
2

Include message action

Add the message hook to access the messages system:
index.tsx
// Add message hook
const { addMessage } = useMessages();
3

Include the message hook to the functions

Update the action hooks to include success and error handlers:
index.tsx
// Add actions with success and error messages
const { execute: executeActionRemoveItems } =
  useCheckoutAction("REMOVE_ITEMS", {
    onSuccess() {
      addMessage({
        type: "success",
        content: "Item removed successfully.",
      });
    },
    onError({ serverError }) {
      addMessage({
        type: "error",
        content:
          serverError?.message ??
          "Failed to remove item. Please try again later or contact support.",
      });
    },
  });

// Add actions for updating item quantity with messages
const { execute: executeActionUpdateItemsQuantity } = useCheckoutAction(
  "UPDATE_ITEMS_QUANTITY", {
    onSuccess() {
      addMessage({
        type: "success",
        content: "Quantity updated successfully.",
      });
    },
    onError({ serverError }) {
      addMessage({
        type: "error",
        content:
          serverError?.message ??
          "Failed to update quantity. Please try again later or contact support.",
      });
    },
  }
);

Final Code

Here’s the complete CartItem component with all features implemented:
import React from "react";
import {
  useCheckoutAction,
  useCheckoutSession,
  useMessages,
  type CheckoutSession
} from "@ollie-shop/sdk";
import styles from "./styles.module.css";

export default function CartItem({
  item = {
    id: "1",
    name: "Product Name",
    quantity: 1,
    price: 10000,
    originalPrice: 12000,
    available: true,
    index: 0,
    image: "https://example.com/image.jpg",
    url: "/product-name/p",
  },
} : {
  item: CheckoutSession['cartItems'][number];
}) {
  const { session } = useCheckoutSession();
  const { addMessage } = useMessages();
  
  const { currency, language } = session.locale;
  
  const hasDiscount = item.originalPrice && item.price !== item.originalPrice;
  
  // Add actions with success and error messages
  const { execute: executeActionRemoveItems } =
    useCheckoutAction("REMOVE_ITEMS", {
      onSuccess() {
        addMessage({
          type: "success",
          content: "Item removed successfully.",
        });
      },
      onError({ serverError }) {
        addMessage({
          type: "error",
          content:
            serverError?.message ??
            "Failed to remove item. Please try again later or contact support.",
        });
      },
    });

  // Add actions for updating item quantity with messages
  const { execute: executeActionUpdateItemsQuantity } = useCheckoutAction(
    "UPDATE_ITEMS_QUANTITY", {
      onSuccess() {
        addMessage({
          type: "success",
          content: "Quantity updated successfully.",
        });
      },
      onError({ serverError }) {
        addMessage({
          type: "error",
          content:
            serverError?.message ??
            "Failed to update quantity. Please try again later or contact support.",
        });
      },
    }
  );

  // Handler for quantity changes
  const handleQuantityChange = async (index: number, newQuantity: number) => {
    if (newQuantity <= 0) return;
    executeActionUpdateItemsQuantity([
      { index, quantity: newQuantity },
    ]);
  };

  // Handler for removing an item
  const handleRemoveItem = async (index: number) => {
    executeActionRemoveItems([index]);
  };
  
  // Format price utility function
  const formatPrice = (price: number) => {
    return new Intl.NumberFormat(language, {
      style: "currency",
      currency: currency,
    }).format(price / 100);
  };

  return (
    <div className={styles.cartItem}>
      {/* Product Image */}
      <div className={styles.imageContainer}>
        {item.image ? (
          <img src={item.image} alt={item.name} className={styles.itemImage} />
        ) : (
          <div className={styles.placeholderImage} />
        )}
      </div>
      
      {/* Product Details */}
      <div className={styles.itemDetails}>
        <h3 className={styles.itemName}>{item.name}</h3>

        {/* Price Display with Discount Logic */}
        {hasDiscount ? (
          <div className={styles.priceContainer}>
            <p className={styles.originalPrice}>
              {formatPrice(item.originalPrice)}
            </p>
            <p className={styles.itemPrice}>{formatPrice(item.price)}</p>
          </div>
        ) : (
          <p className={styles.itemPrice}>{formatPrice(item.price)}</p>
        )}
      </div>
      
      {/* Quantity Controls */}
      <div className={styles.itemActions}>
        <div className={styles.quantityControl}>
          <button
            type="button"
            className={styles.quantityButton}
            onClick={() => handleQuantityChange(item.index, item.quantity - 1)}
            disabled={item.quantity <= 1}
            aria-label="Decrease quantity"
          >
            -
          </button>
          <span className={styles.quantity}>{item.quantity}</span>
          <button
            className={styles.quantityButton}
            type="button"
            onClick={() => handleQuantityChange(item.index, item.quantity + 1)}
            aria-label="Increase quantity"
          >
            +
          </button>
        </div>

        {/* Remove Button */}
        <button
          className={styles.removeButton}
          type="button"
          onClick={() => handleRemoveItem(item.index)}
          aria-label="Remove item"
        >
          <span>Remove</span>
        </button>
      </div>
      
      {/* Total Price */}
      <b className={styles.itemTotal}>
        {formatPrice(item.price * item.quantity)}
      </b>
    </div>
  );
}