> ## Documentation Index
> Fetch the complete documentation index at: https://docs.ollie.shop/llms.txt
> Use this file to discover all available pages before exploring further.
# Functions
> Add custom business logic to your checkout that is impossible with traditional e-commerce platforms. Modify any attribute from your cart. Integrate with any API.
With Ollie Shop you don't have to take no for an answer. You are now able to build complex business rules without overloading your customer's experience.
Add validation rules, dynamic pricing, inventory checks, and custom integrations. Transform checkout data with your exact business requirements.
Deploy instantly without managing servers. Functions scale automatically from one order to millions. Pay only when they run.
Ollie Shop act as a proxy to your ecommerce provider. As you can see on the diagram below Ollie Shop sits between the Client (or the UI) and the ecommerce platform.
Ollie Components can be used as your UI, but we've created Ollie Functions completely separate on purpose, this way we make sure to run the functions server-side and we also allow external clients to use Ollie Functions (think of native apps that can take advantage of the functions already built for your web checkout).
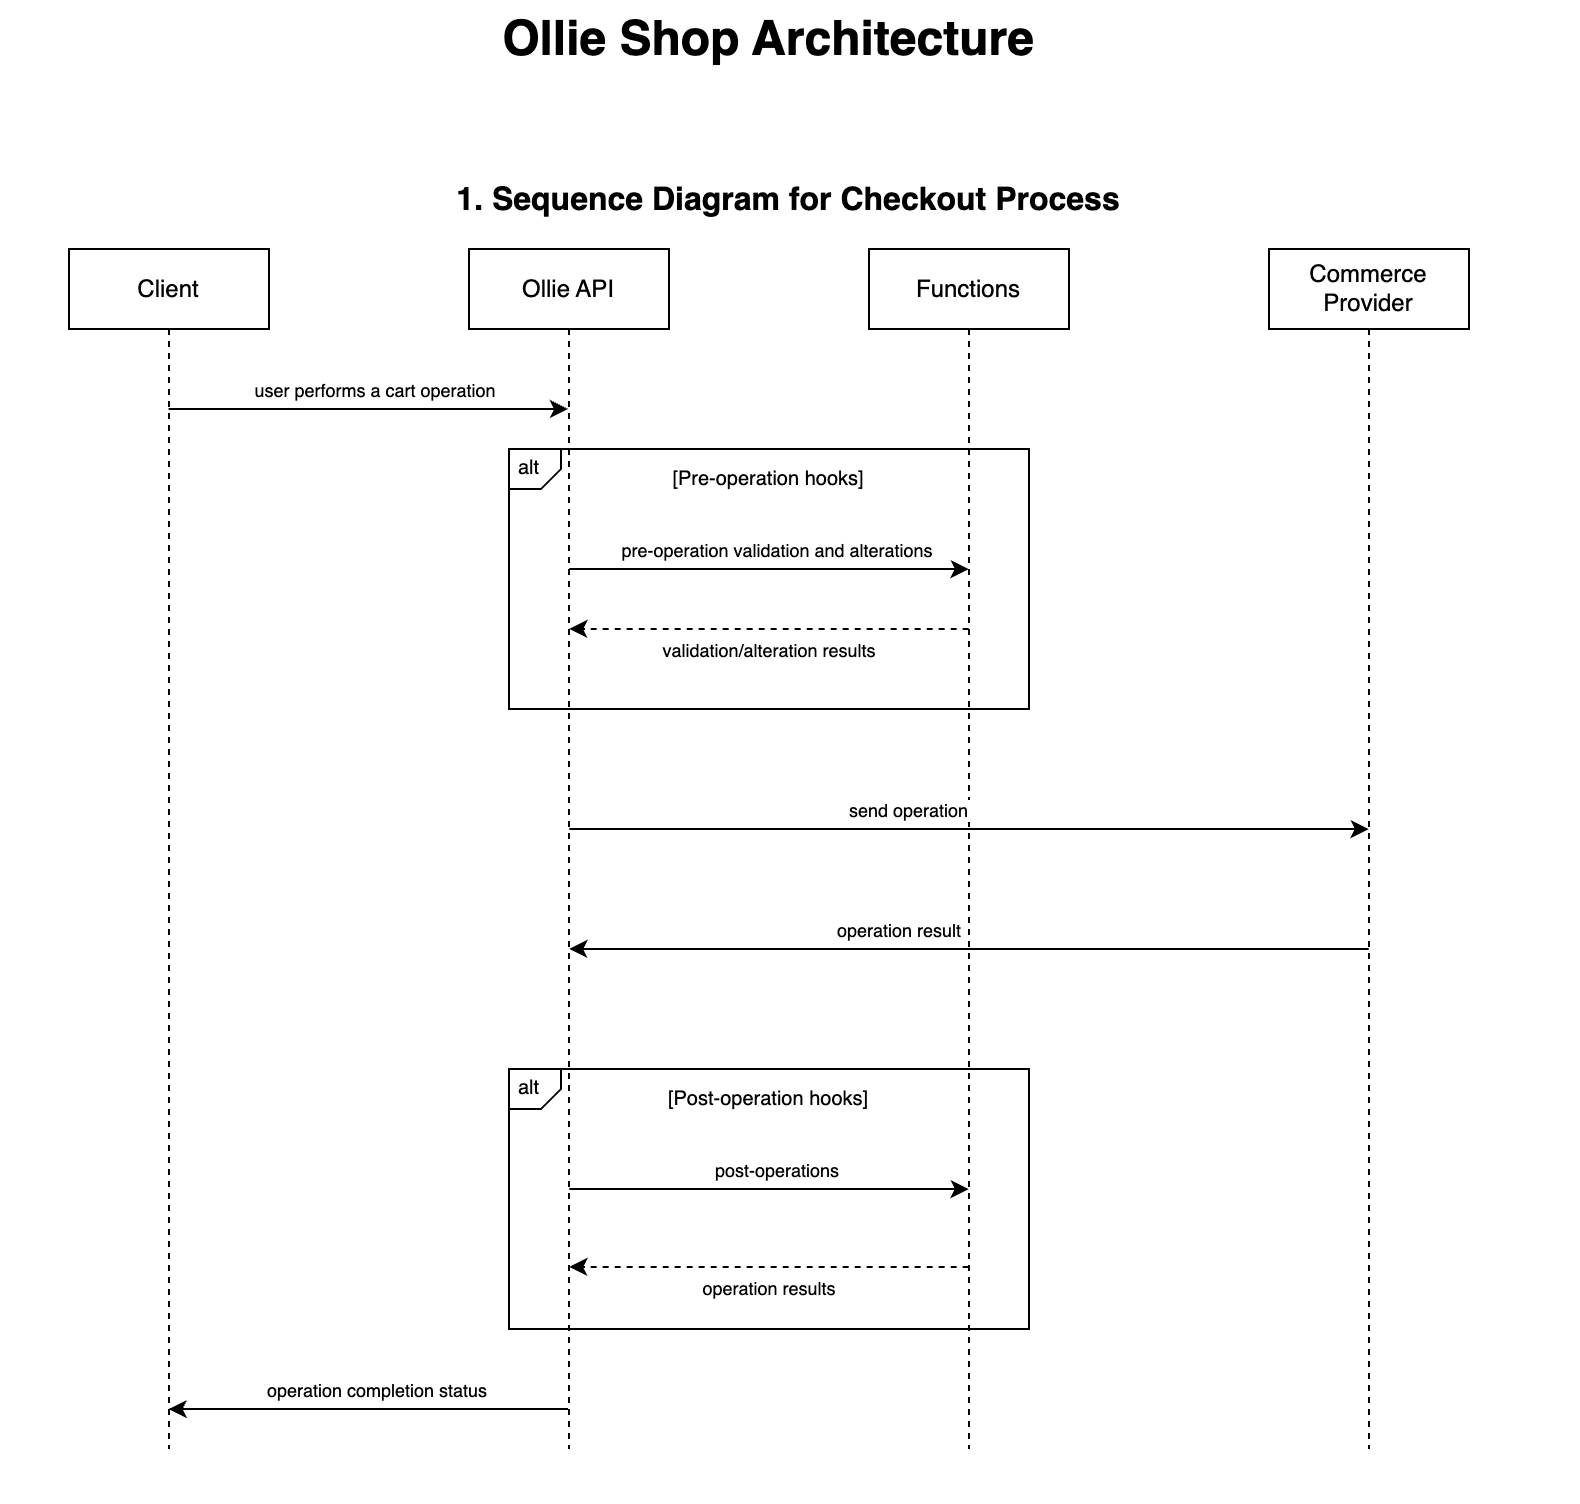 All Functions run server-side guaranteeing security and maximum performance.
## Function Triggers
Functions are similar to AWS Lambda's, it's where we store and run your custom code.
The most important aspect of a Function is to determine when it should be executed, meaning what will trigger the Function.
Given the headless nature of Ollie Shop, there are many HTTP requests flowing between the client and the server. You can define any of these HTTP request as a trigger.
### Example - execute function when the user adds their email to the cart
Let's say you want to run a customization that runs a background check everytime the user add's an email to the cart.
The traditional way of thikning how to approach this problem is to build a new textbox component and in this component use AXIOS or a similar lib to fetch an external API, directly ffrom the component.
Clear downsides is that you'll depend on the browser, and also the front-end developer will have to know how this external API works.
With Ollie this is not required. You know that there is already a textbox where the user will enter their email, the Contact Step in your checkout process.
You also know that this action will use the Ecommerce Provider API to add the email to the cart data.
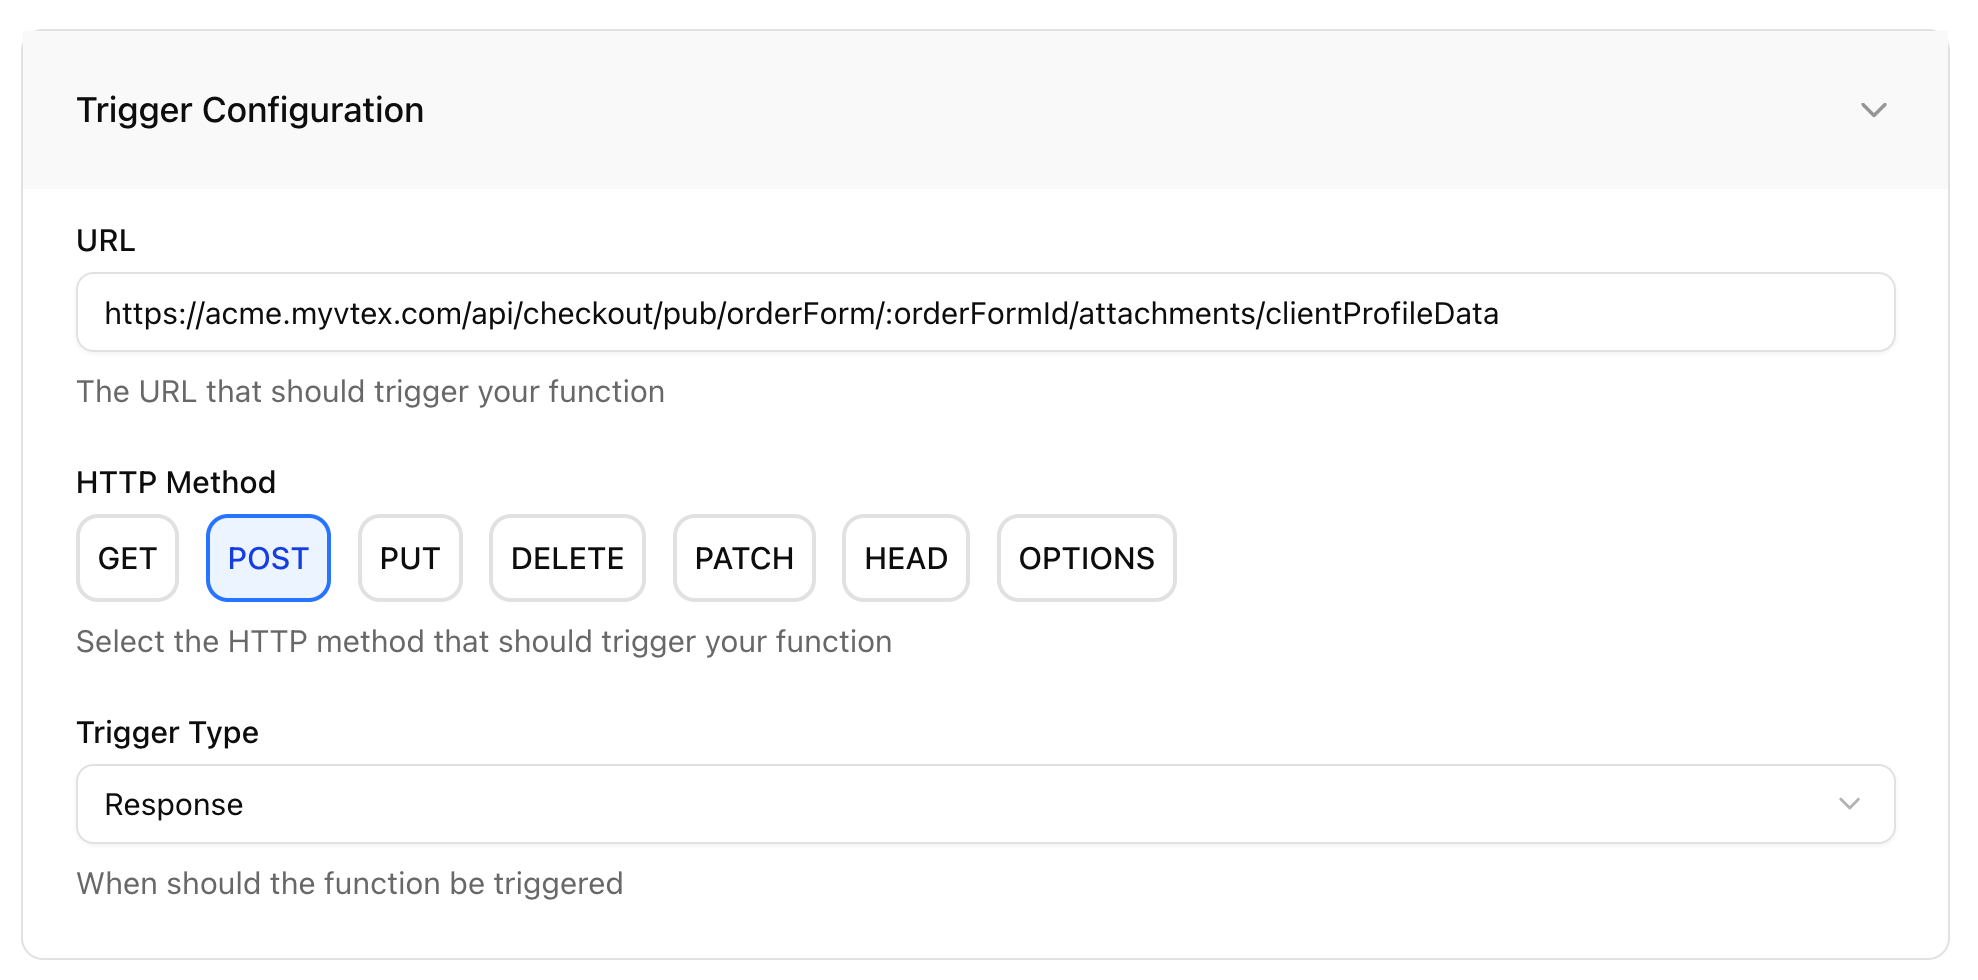
**Example:** the VTEX API that adds the client profile data - accountName.myvtex.com/api/checkout/pub/orderForm/:orderFormId/attachments/clientProfileData
You can configure a function to "listen" to this API (HTTP request).
All Functions run server-side guaranteeing security and maximum performance.
## Function Triggers
Functions are similar to AWS Lambda's, it's where we store and run your custom code.
The most important aspect of a Function is to determine when it should be executed, meaning what will trigger the Function.
Given the headless nature of Ollie Shop, there are many HTTP requests flowing between the client and the server. You can define any of these HTTP request as a trigger.
### Example - execute function when the user adds their email to the cart
Let's say you want to run a customization that runs a background check everytime the user add's an email to the cart.
The traditional way of thikning how to approach this problem is to build a new textbox component and in this component use AXIOS or a similar lib to fetch an external API, directly ffrom the component.
Clear downsides is that you'll depend on the browser, and also the front-end developer will have to know how this external API works.
With Ollie this is not required. You know that there is already a textbox where the user will enter their email, the Contact Step in your checkout process.
You also know that this action will use the Ecommerce Provider API to add the email to the cart data.
**Example:** the VTEX API that adds the client profile data - accountName.myvtex.com/api/checkout/pub/orderForm/:orderFormId/attachments/clientProfileData
You can configure a function to "listen" to this API (HTTP request).
 Ollie Shop Functions can be seem as interceptors of HTTP requests.
When the HTTP is called, Ollie Shop will check if there are any Functions associated with it.
In our example, there is one, and we configured it to run on the **response**, meaning that Ollie is actually intercepting the responde of the HTTP request, before it get's back to the client (component).
Your function will not only use the API as a trigger, but it can also use the request/response payload of that API for it's own purposes.
```json response /api/checkout/pub/orderForm/:orderFormId/attachments/clientProfileData theme={"system"}
{
...
"clientProfileData": {
"email": "thomas@low.beer",
"firstName": "T***",
"lastName": "L***",
"document": "***63",
"documentType": "cpf",
"phone": "***30",
...
},
...
}
```
By using the "Add Profile to Cart" as a trigger we are taking advantage of the fact that in a normal chekout flow you want the user to add their email to the cart. We are "piggybacking" on an action that was already meant to happen
Ollie will now run your custom code that gets the user's email from the body of the response from the "add client to the cart" API - `clientProfileData.email` - and use this data in the custom code you deployed to the function.
Below an example of how to use the payload inside a function
```typescript Example of how to use the available request/response payload in a function theme={"system"}
export const handler = async ({ res }: { req: Request; res: Response }) => {
const rawSession = await res.json();
try {
// Enhance the cart response by adding background check validation
// This demonstrates how to extend the original API response with custom data
const newSession = {
...rawSession,
clientProfileData: {
...rawSession.clientProfileData,
backgroundCheck: "approved",
}
};
return new Response(JSON.stringify(newSession), res);
} catch (error) {
// Handle errors gracefully and return original response if processing fails
console.error('Function execution failed:', error);
return new Response(JSON.stringify(rawSession), res);
}
};
```
Once your code runs, the data that it returns can be added to the response of the API that was used as a trigger, effectively "extending" the original API. In our example we added a new attribute to the body of the response - `clientProfileData.backgroundCheck`
```json response of the original HTTP enriched with the Function focus=10 theme={"system"}
{
...
"clientProfileData": {
"email": "thomas@low.beer",
"firstName": "T***",
"lastName": "L***",
"document": "***63",
"documentType": "cpf",
"phone": "***30",
...
"backgroundCheck": "approved",
...
},
...
}
```
## Function Types
**Invocation Type**
* `Request` Runs **before** the HTTP setup as the trigger
* `Response` Runs **after** the HTTP setup as the trigger
The example above was for a **response** function, meaning that your custom code will run after the HTTP request that triggered it has happened, so that you have access to the *response* of that HTTP request (but before the response reaches the client).
You should use a **request** type of function when you wish to make a validation before the HTTP request actually happens, for example, if you have a rule where a max/min quantity of items can be bought. So before the HTTP request (add to cart API) is actually executed, your custom function will check against an external database what is the limit for that SKU. If the limit exceeds the updated quantity your function can abort the HTTP request and the add to cart API is not even executed.
**intercept an HTTP request and modify the payload**
Use them for validation, data modification, and pre-processing logic.
**intercept an HTTP request and modify the response**
Use them for post-processing, integrations, and response enhancement.
## Error Handling Strategies
Understanding error handling is crucial for building reliable checkout flows:
* **Throw** - an error message will appear for the user
* **Skip** - the user will continue it's journey and the error will be suppressed.
Ollie Shop Functions can be seem as interceptors of HTTP requests.
When the HTTP is called, Ollie Shop will check if there are any Functions associated with it.
In our example, there is one, and we configured it to run on the **response**, meaning that Ollie is actually intercepting the responde of the HTTP request, before it get's back to the client (component).
Your function will not only use the API as a trigger, but it can also use the request/response payload of that API for it's own purposes.
```json response /api/checkout/pub/orderForm/:orderFormId/attachments/clientProfileData theme={"system"}
{
...
"clientProfileData": {
"email": "thomas@low.beer",
"firstName": "T***",
"lastName": "L***",
"document": "***63",
"documentType": "cpf",
"phone": "***30",
...
},
...
}
```
By using the "Add Profile to Cart" as a trigger we are taking advantage of the fact that in a normal chekout flow you want the user to add their email to the cart. We are "piggybacking" on an action that was already meant to happen
Ollie will now run your custom code that gets the user's email from the body of the response from the "add client to the cart" API - `clientProfileData.email` - and use this data in the custom code you deployed to the function.
Below an example of how to use the payload inside a function
```typescript Example of how to use the available request/response payload in a function theme={"system"}
export const handler = async ({ res }: { req: Request; res: Response }) => {
const rawSession = await res.json();
try {
// Enhance the cart response by adding background check validation
// This demonstrates how to extend the original API response with custom data
const newSession = {
...rawSession,
clientProfileData: {
...rawSession.clientProfileData,
backgroundCheck: "approved",
}
};
return new Response(JSON.stringify(newSession), res);
} catch (error) {
// Handle errors gracefully and return original response if processing fails
console.error('Function execution failed:', error);
return new Response(JSON.stringify(rawSession), res);
}
};
```
Once your code runs, the data that it returns can be added to the response of the API that was used as a trigger, effectively "extending" the original API. In our example we added a new attribute to the body of the response - `clientProfileData.backgroundCheck`
```json response of the original HTTP enriched with the Function focus=10 theme={"system"}
{
...
"clientProfileData": {
"email": "thomas@low.beer",
"firstName": "T***",
"lastName": "L***",
"document": "***63",
"documentType": "cpf",
"phone": "***30",
...
"backgroundCheck": "approved",
...
},
...
}
```
## Function Types
**Invocation Type**
* `Request` Runs **before** the HTTP setup as the trigger
* `Response` Runs **after** the HTTP setup as the trigger
The example above was for a **response** function, meaning that your custom code will run after the HTTP request that triggered it has happened, so that you have access to the *response* of that HTTP request (but before the response reaches the client).
You should use a **request** type of function when you wish to make a validation before the HTTP request actually happens, for example, if you have a rule where a max/min quantity of items can be bought. So before the HTTP request (add to cart API) is actually executed, your custom function will check against an external database what is the limit for that SKU. If the limit exceeds the updated quantity your function can abort the HTTP request and the add to cart API is not even executed.
**intercept an HTTP request and modify the payload**
Use them for validation, data modification, and pre-processing logic.
**intercept an HTTP request and modify the response**
Use them for post-processing, integrations, and response enhancement.
## Error Handling Strategies
Understanding error handling is crucial for building reliable checkout flows:
* **Throw** - an error message will appear for the user
* **Skip** - the user will continue it's journey and the error will be suppressed.
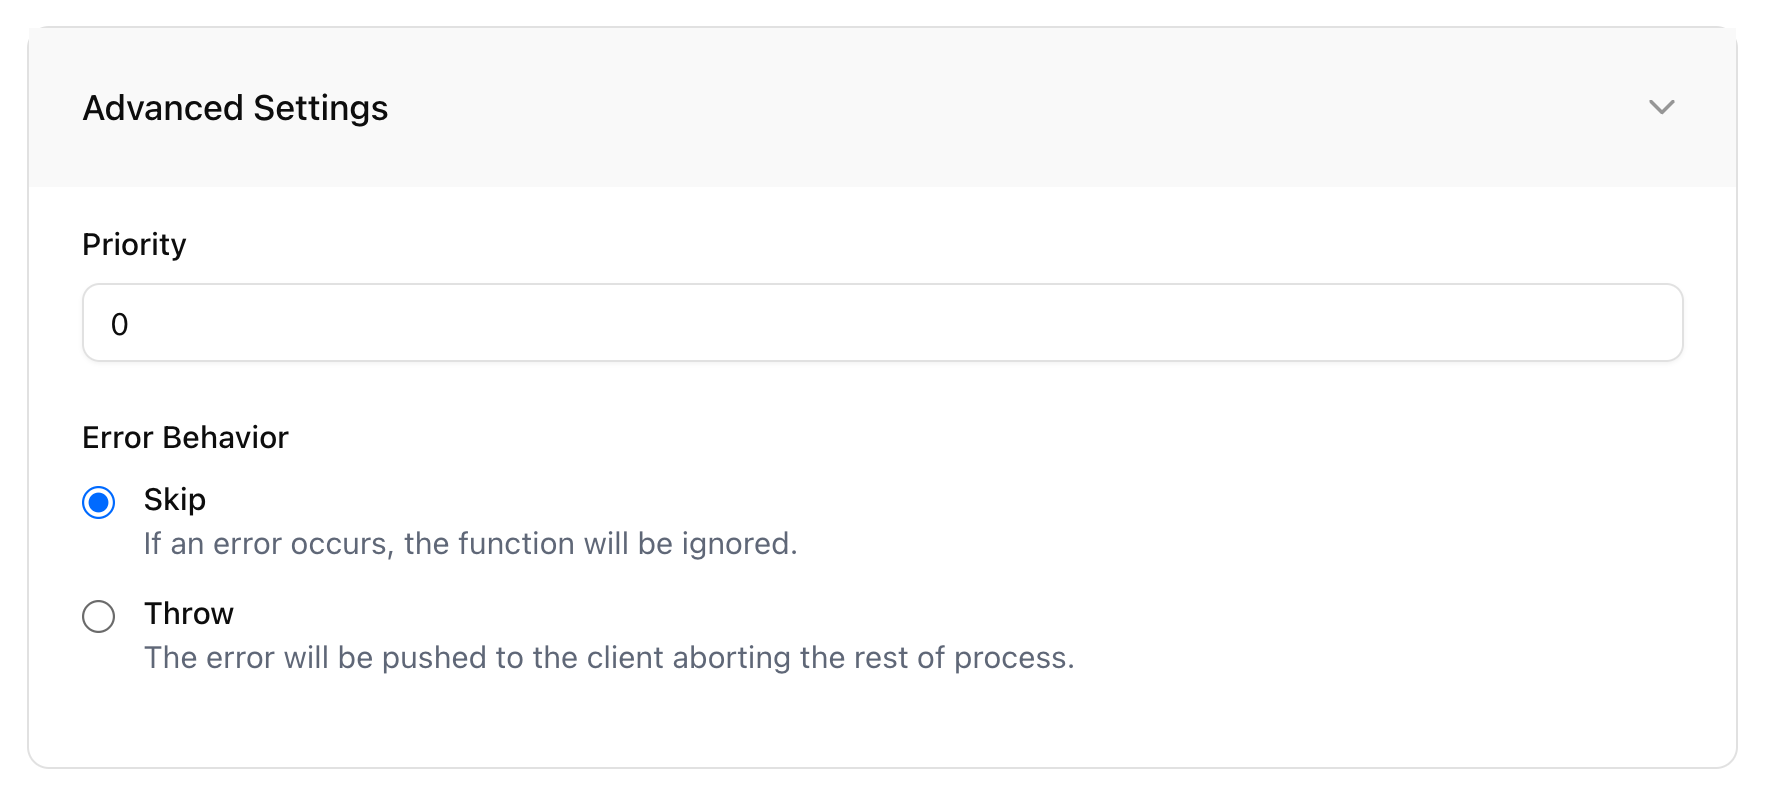 **Best Practice**: Use `throw` for anything that affects order validation or payment. Use `skip` for analytics, logging, and optional features.
## Priority
If you need to trigger multiple functions using the same trigger, you can use the `priority` feature. This creates an order in which Ollie Shop will trigger your functions. When a functions is triggered it will use the data made available from the previous function.
Priority starts with `0` (zero) and currently there are no limits on the number of functions you can trigger.
**Best Practice**: Use `throw` for anything that affects order validation or payment. Use `skip` for analytics, logging, and optional features.
## Priority
If you need to trigger multiple functions using the same trigger, you can use the `priority` feature. This creates an order in which Ollie Shop will trigger your functions. When a functions is triggered it will use the data made available from the previous function.
Priority starts with `0` (zero) and currently there are no limits on the number of functions you can trigger.